When getting 8-tracks from their usual sources — flea markets, thrift stores, eBay, puzzled-but-obliging relatives — you’ll find that many, probably most, are going to need some type of repair. This fully illustrated guide includes complete instructions on fixing 8-track cartridge maladies.
Part One: Opening the Cart
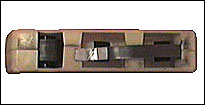
There is, fortunately, but a small number of 8-track cartridge designs, and no 8-track is impossible to open, though it may sometimes seem like it. Opening it up can cause a bit of cosmetic damage to the shell, but it won’t affect play unless you’re a real butcher. If you’re a collector whose main concern is preserving the condition of the cartridge, for display purposes or resale, it would probably be best not to try to experiment with opening it.
The main thing to remember when opening an 8-track is to do it right-side up. Do not open it upside down, because the tape will spill out everywhere, and you’ll be spending an hour or two winding it all back and untangling it. Right-side up is when the cart is laid flat on a surface and the main label — the sticker with the album’s front cover picture on it — is facing the ceiling.
Carts with tabs to pry
Perhaps the easiest carts to open are Columbia TC8s. There are three tabs on the front of these that can be bent back with a screwdriver; the top then lifts right off. Sometimes one (or more) of the tabs will break, even if you’re careful. Don’t worry; with practice this gets easier, and if the top won’t stay on because of some broken tabs, you can just tape the cart together after you’re done inside.
A very common style of 8-track has tabs underneath the cart (usually 5). These can be very straightforward or aggravating, depending on how well the factory was cranking out these little plastic pieces that day. To pry them back, I use a small screwdriver on one of the corner tabs. When I’ve got that one then I do the others. Often it is just about impossible to get a tab pushed back enough; I’ll usually just pry and twist the cartridge top off near that tab. Sometimes the tab breaks, sometimes it doesn’t. With five places to secure the top to the bottom, though, a couple tabs won’t make a difference.
Some 8-tracks, such as Capitol issues, have two flat tabs, about a half an inch long, both usually on the underside of the cart. I often wind up breaking the case on these because the tabs frustrate me, but with patience it can be done right. Looking at the underside of the cart, with the end label pointed toward you, put a flat screwdriver into the slot near the far end (near the end where the tape is exposed). Push the screwdriver away from you; the tab is actually connected to the top of the cart, and you need to bend it toward you. The cart’s other tab (closer to you) is the one that gives me trouble. Sometimes you can make all your repairs without doing this one at all — by bending the cart open just enough. Remember to put the cart front-label up before taking it apart.
More: 8-Track Tape Player and Recorder Units
When putting a cart with tabs back together, the tabs should simply snap back into place.
Carts held together with screws / RCA carts
Another easy type to open are the ones with a screw (sometimes two screws) on the front of the 8-track. The biggest problem, of course, is that you generally have to poke a hole in the label to do this (which, again, doesn’t affect play).

RCA carts are among the toughest to get in to. Either you rip half the case off, or you drill out the screw thingy on the underside (obviously the preferred method).
Get a small drill bit, and carefully drill straight down into the screw, down past its head. Eventually you will be able to easily take the top of the cart off and make your repairs. It will need to be taped or glued back together. Fortunately, RCA tapes are well made, and many don’t need any repairs. Even their splices often seem to be holding up.
Carts with no tabs or screws
Sometimes an 8-track is simply held together by glue, around all the edges and/or on interlocking parts. These have to be pried apart, and, almost every time, taped or (carefully) glued back together.
In short, it’s pretty easy to open an 8-track cartridge. It’s generally some combination of poking, prying and mashing your fingers, but it gets to be second nature after a while. There are only a finite number of cartridge styles, and they really don’t differ too much.
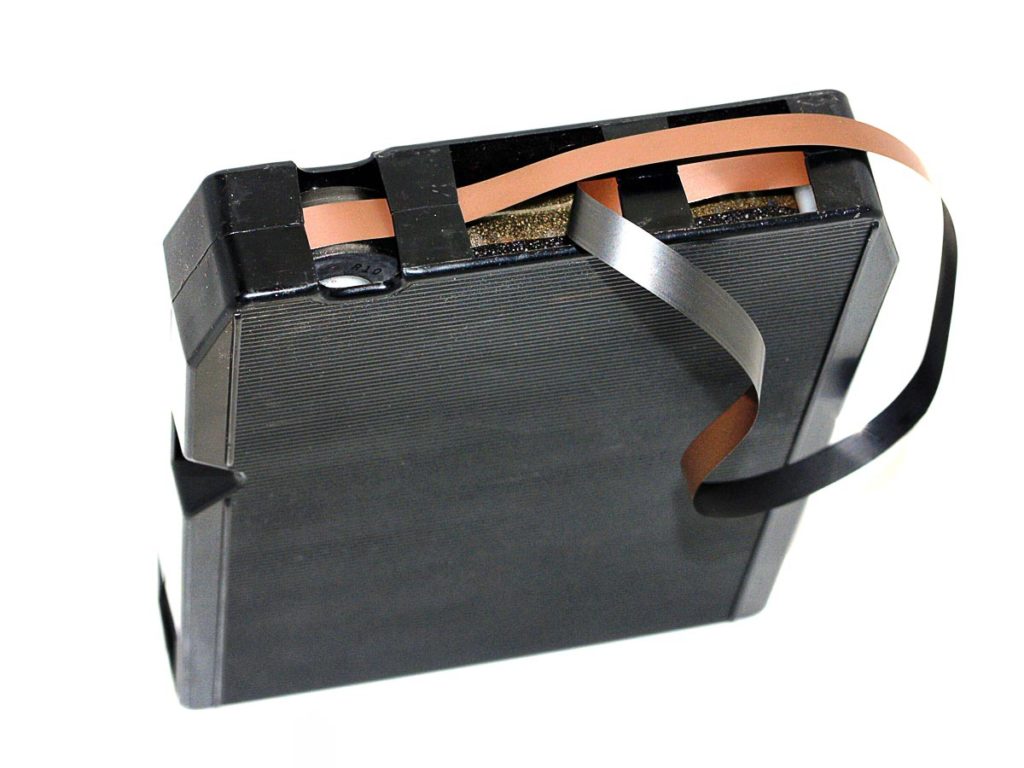
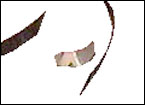
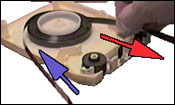
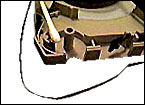
Part Two: Decayed Foam Pads
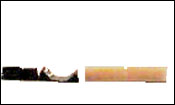
The foam must still be as resilient as it was the day it was made. If you push on it and it stays pushed down, even a little, replace it. The purpose of the foam is to press the tape up against the play head in your player, and if it isn’t doing its job, the sound can be muffled, go in and out, or slip to other tracks.
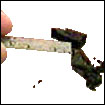
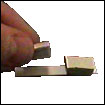
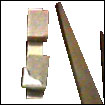

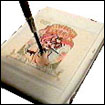
The pictures above shows how to replace a foam pad. Open the cart, take out the decayed foam pad, which is stuck to a thin white (usually) piece of plastic. Scrape the old foam off the plastic piece.
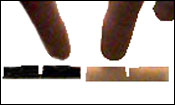
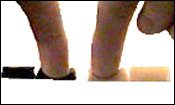
Cut two small sections of 1/4-inch thick weatherstripping and stick them to the back of the plastic piece. (I use the back, since the weatherstripping may stick better, and the old gunky foam on the other side can help stick the whole piece back into place.) Be sure to leave a space in the middle and on either end of the plastic part (this doesn’t matter on all 8-tracks, but it does on most, and it’s good to get in the habit). Some trackers recommend peeling off the paper layer from the foam, and cutting clear scotch tape to fit for smoother passage. Clean out any leftover foam decay from the cart and place the piece back in, making sure that it goes into the grooves (if any).
Some 8-tracks have their foam mounted on a slightly bent, springy metal piece. This foam — actually a little felt pad — usually doesn’t decompose per se, but it does tend to come unglued and get lost. To replace one, just glue it back on with a drop of superglue, or if you don’t have the pad anymore, get a roll of 1/8-inch thick weatherstripping, cut a small square and stick it right on the metal plate. Put the metal piece back in place, and there you are.
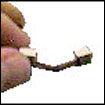
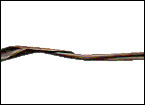
Part Three: Broken Splice
The splice holds together the ends of the tape, creating the 8-track’s legendarily “continuous” loop. It is a piece of metal foil with adhesive backing (i.e., splicing tape), and this adhesive, over time, can come undone and fall off, interrupting the loop. This is generally what has happened when someone complains that their 8-track tape “broke.” It’s the most common and simplest repair.
You’ll need a roll of splicing tape, a.k.a. sensing foil. Once you’ve located the place where the splice goes (which, if the tape has come undone while you were playing it, is right there already), discard the old splice and cut a new piece. Be sure not to cut it too long, as that will cause the 8-track player to change two or more programs at once. Then join the two ends of the tape, making the loop continuous again.
To make sure it’s lined up just right, you can use a splicing block, but it’s not strictly necessary. Press hard with a pencil’s eraser so it sticks good! The most important thing when replacing the splice is that the metal foil faces outward — same side of the tape as the music; visible when the tape case is closed (it has to face the player during play). Some trackers suggest putting a piece of foil on the back of the repair too, to make the splice stronger. Wind any loose tape back onto the reel if necessary (see below) and you’re done with the splice.
More on MegaMinistore: Sealed 8-track tapes: New vintage tapes never opened
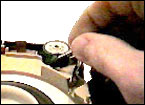
Part Four: Tight Tape
Some 8-tracks just won’t turn — the tape seems to be wound too tightly on the hub. This problem seems insurmountable but it’s actually easy to remedy. I’ve restored life to carts that seemed like the entire reel of tape had hardened into a single dense rock (I’m looking at you, Queen Live Killers.)
Open the cart and snip the tape near where it emerges from the inner hub on its way out to be played, leaving a small two- or three-inch piece sticking out. Now unwind some tape from the outside of the wheel. About 2 feet should do it — it really depends on how tight it is.
See also: 4-track tapes: Vintage cartridges from the 1960s
Reattach the tape on the back (not on the music side!) with a small piece of splicing tape, creating the continuous loop again and making sure that the tape hasn’t become twisted like a Moebius strip. You will still have too much tape off the reel at this point.
Pull the tape from the inner hub, guiding the tape back onto the outer hub as the wheel turns. It may be a little tight at first, so be gentle but firm. As you pull, make sure the tape is being wound correctly (i.e., straight and flat) onto the outer edge. Since the “takeup” outer edge is bigger than the inner edge you’re pulling from, the tape will eventually be wound back and the amount you pulled out will be back in place.
This should do the trick; if not, repeat the process. Make sure it moves okay for a little ways, then put the case back together. If the tape becomes tight again after a few plays, repeat this process. Eventually, even the tightest tapes will become obedient.
(And don’t ask me why tapes don’t get too tight all the time — seems like they would, but left in normal conditions and played periodically, the tension created from the inner and outer hub circumferential differences doesn’t seem to matter. Just shrug and pop in a new cart if the concept gets you down.)
Part Five: Curled and Accordioned Tape
Sometimes a section of tape gets curly or damaged somehow. “Accordioned” tape is just what it sounds like — a section of tape that has kind of backed up while being played, bending and creasing back and forth apparently to death.
Browse 49 current 8-track repair supplies for sale offers here
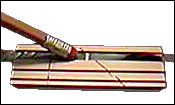
But no, it’s not dead! Twisted, mangled tape can be restored to showroom condition very easily… with a little smooth heat.
For this repair you can use a clothing iron. Set the iron on a low setting (start with the lowest and go up from there if you need to until you know your iron well). To iron tape, it is necessary to cut the tape and unwind it from the wheel as far as the mangled part of the tape goes. Slowly and steadily pull the tape across the metal edge of the iron (be sure to use the edge, not the flat part you’d use on clothes). The tape will be flat, and good as new. If there are still some creases, repeat the process. If it doesn’t seem to get out all the creases to your satisfaction, try a little more heat. Don’t be too gun-shy — you’re only holding a tiny sliver of the tape on the hot metal surface at any one time, holding it on either side with your two hands. If it gets too hot and snaps, just join it back together with a piece of splicing tape on the back (non-music side); you will have lost only the tiniest sliver of music.
To replace your long string of now-flat tape, just wind the wheel clockwise, and make sure the loose tape goes along the outer edge properly. When you get to the end, put a small section of splicing tape on the back to repair the cut you made. (Do not use household adhesive tape to repair a splice, because it can gum up over time and cause more problems.) Put the tape back together and enjoy!
NOTE: One 8-track problem that can’t be helped is when tape is stretched. That distorts the tape too much and there is nothing that can be done. Sorry! (In all the hundreds and hundreds of tapes I’ve fixed, I don’t recall ever having a tape stretched. It could happen through some bizarre sort of misuse I suppose, but it would likely have to be done manually rather than by a rogue tape player or anything.)
Part Six: Gooey Pinch Roller
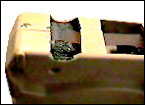
The pinch roller is the little wheel (a little less than an inch in diameter) inside the 8-track tape that rolls the tape along and pushes the actual bit of tape being played right now against the head of your player/recorder. It is made of either plastic or rubber.
Over time, rubber pinch rollers sometimes decompose into a delicate, sticky mess. The worst thing about it is that is has become an unruly petroleum byproduct, and gets all over everything. If you put an 8-track with a gooey pinch roller in your player, the stuff will get everywhere, all on the insides of the player, and cleanup will be a very long process. In short, it is crucial that you replace decomposed pinch rollers before inserting a tape!

To see if the roller is bad, generally you need only look at it. If it appears wet or gooey, it is. Some decomposed rubber pinch rollers, on the other hand, appear ok, having gotten dry and crumbly instead of gooey (these still need to be replaced). If you aren’t sure, take a toothpick or something and touch the pinch roller with it to determine if this repair is necessary.
After opening the cart up, carefully lift the offending pinch roller off of its spindle and throw it away. Try not to touch it too much with your fingers, or let it touch the tape or case (cleanup will take longer). Clean every bit of the stuff off of the 8-track case and tape; I use Q-tips and an alcohol/water solution (plain water would probably also do the trick). Don’t be afraid to go through dozens of Q-tips getting the stuff off; it’s worth it.
Once everything is dry, get a pinch roller from an unused cart (it doesn’t necessarily have to be rubber. There is a debate over rubber vs. plastic rollers; use your own judgement. I prefer rubber since plastic ones tend to slip during play). Make sure it’s reasonably the same size (inner circumference, outer circumference, diameter and thickness), and drop it onto the spindle. Make sure the roller spins okay.
Spin the 8-tracks big wheel to take up any excess tape, making sure that the tape passes through its original path. Put the cart back together, make sure there is no extra gunk hanging around, and try it out. (If you got goo in your player too, take it apart and clean it real well before playing any tape in it.)
Vintage Audio Tapes By Artist Name
This guide should cover virtually all problems you could encounter when accumulating new old 8-track tapes. Once you repair a few, it gets easier, and the tougher ones can actually be more rewarding as they offer greater challenges. Part of the fun of 8-track tapes today is the sheer hassle you have to go through to get to the music — a situation that tends to keep out everyone but the most dedicated of music fans.
Enjoy your repairs, and happy tracking!


